A Sunny Square for Sharing
I made these gluten-free lemon bars with cassava flour for a small afternoon gathering, hoping for a dessert that was easy to cut and pass around. The first square had a buttery crust, a soft lemon filling, and just enough tartness to make me reach for another bite. A light dusting of powdered sugar made the whole pan look ready for company.

Cassava flour gives the shortbread-style base a fine, tender texture. It also thickens the filling without wheat flour. These cassava flour lemon bars need time to cool and chill, so I like baking them before the day I plan to serve them.
What Goes Into the Pan
Use an 8-inch square pan for bars with a distinct crust and lemon layer. Line it with parchment paper, leaving an overhang on two sides so you can lift out the chilled dessert before cutting.
For the crust:
- 1 cup cassava flour
- 1/4 cup granulated sugar
- 1/4 teaspoon fine salt
- 1/2 cup unsalted butter, melted and slightly cooled
For the lemon filling:
- 3 large eggs
- 3/4 cup granulated sugar
- 1/2 cup fresh lemon juice
- 1 tablespoon finely grated lemon zest
- 1 tablespoon cassava flour
- Pinch of fine salt
- Powdered sugar, optional, for serving
Cassava flour is not the same ingredient as tapioca starch, even though both come from cassava. For this gluten-free lemon bar recipe, use cassava flour in the crust and filling as listed. The amount in the filling is small on purpose: it helps the lemon layer set without making it heavy.
Bake the Crust and Filling
- Heat the oven to 350°F (175°C). Line an 8-inch square baking pan with parchment paper, leaving an overhang on two sides.
- In a medium bowl, whisk together the cassava flour, sugar, and salt for the crust.
- Pour in the melted butter. Stir until the mixture is evenly moistened and forms soft crumbs.
- Tip the mixture into the prepared pan. Press it firmly and evenly across the bottom, paying attention to the corners.
- Bake the crust for 18 to 22 minutes, until it looks set and its edges are lightly golden.
- While the crust bakes, whisk the eggs and sugar for the filling until combined. Whisk in the lemon juice, zest, cassava flour, and salt until smooth.
- When the crust is ready, stir the filling once more and pour it over the hot crust. Return the pan to the oven.
- Bake for 20 to 25 minutes, until the edges of the filling are set and the center has only a slight wobble when you gently move the pan.
- Cool the bars completely in the pan, then cover and refrigerate for at least 3 hours.
- Lift the chilled slab out by the parchment overhang. Cut into 16 squares with a sharp knife, wiping the blade between cuts. Dust with powdered sugar just before serving, if desired.
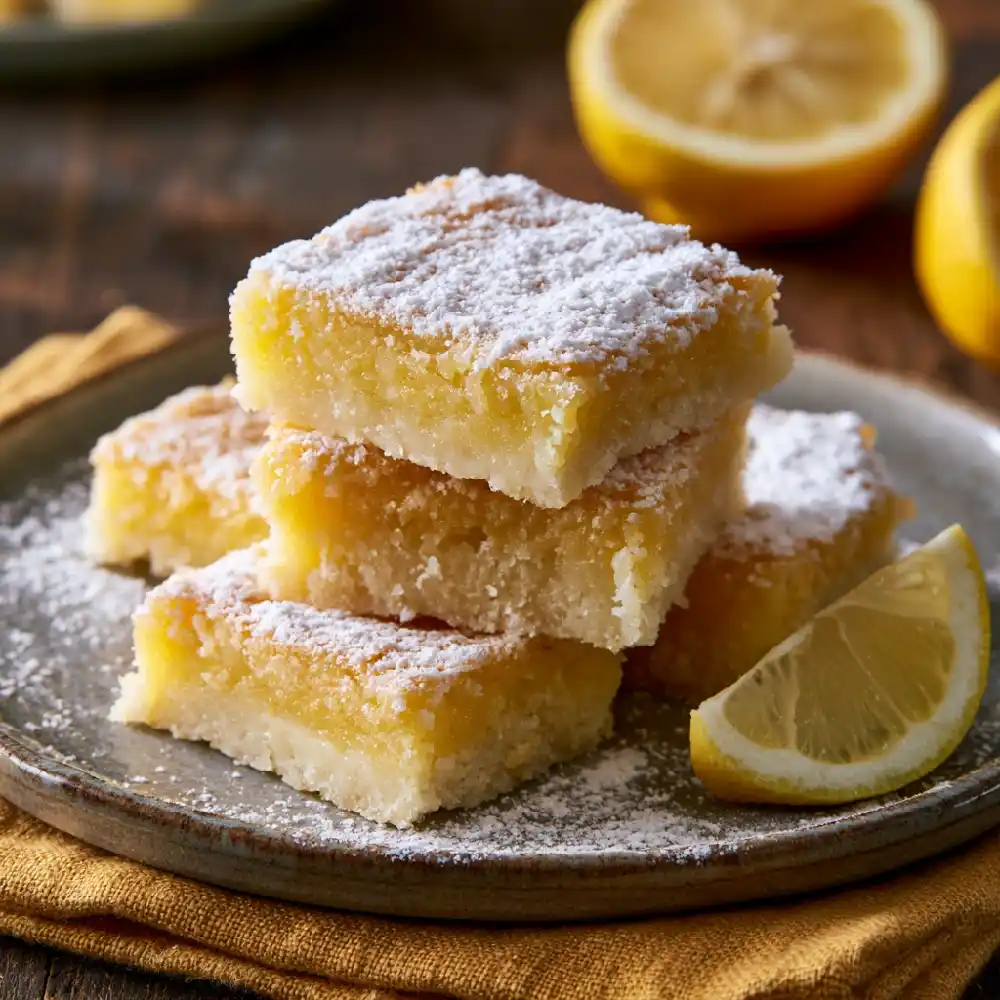
Pouring the filling onto the hot crust helps the two layers bake together. You can prepare the filling while the base is in the oven, but give it a quick stir before pouring so the cassava flour stays evenly mixed.
Little Ways to Serve Them
I usually serve these lemon bars cold from the refrigerator. Their filling is easiest to cut when chilled, and the cool, tart lemon tastes especially good after a meal.
- Dust with powdered sugar shortly before serving.
- Add a few fresh raspberries to each plate.
- Pair a square with sliced strawberries.
- Cut smaller bites for a dessert tray.
- Serve with hot tea or unsweetened coffee.
- Add blueberries on the side for a colorful brunch plate.
Powdered sugar can dissolve into the moist surface as the bars sit. If I am taking a tray to a gathering, I pack the chilled squares first and add the sugar when I arrive. They are just as good without it.
Pro Tips for Clean Squares
- Press the crust firmly into an even layer. A loosely packed base is more likely to crumble when you lift and slice the bars.
- Measure the cassava flour carefully. Too much in the crust can make it dry, while extra flour in the filling can dull its smooth texture.
- Use fresh lemon juice and zest. The zest brings fragrance, and the measured juice gives the filling its tart flavor.
- Whisk the filling until smooth, but avoid beating in lots of air. A few bubbles on the surface are harmless, though a gentle whisk makes a tidier top.
- Look for a slight wobble in the center rather than baking until the filling is completely firm. It continues to set as it cools and chills.
- Chill before cutting. A warm lemon bar may taste lovely, but its filling will not yet hold a neat square.
Gluten-Free Lemon Bars with Cassava Flour
Ingredients
Equipment
Method
- Preheat the oven to 350°F (175°C). Line an 8-inch square baking pan with parchment paper, leaving an overhang on two opposite sides to make the chilled bars easier to lift out.
- In a medium bowl, whisk together the cassava flour, granulated sugar, and fine salt for the crust until evenly combined.
- Pour the melted, slightly cooled butter into the dry ingredients. Stir until the mixture is evenly moistened and forms soft crumbs.
- Transfer the crust mixture to the prepared pan. Press it firmly and evenly across the bottom, making sure to pack the corners so the base holds together when sliced.
- Bake the crust for 18–22 minutes, until it looks set and the edges are lightly golden. While it bakes, prepare the lemon filling.
- In a mixing bowl, whisk the eggs and granulated sugar until combined. Add the fresh lemon juice, finely grated lemon zest, cassava flour, and a pinch of salt. Whisk gently until the filling is smooth and no flour lumps remain.
- When the crust is ready, stir the lemon filling once more to redistribute the cassava flour. Carefully pour the filling over the hot crust, spreading it evenly if necessary.
- Return the pan to the oven and bake for 20–25 minutes, until the edges of the filling are set and the center has only a slight wobble when the pan is moved gently. Avoid baking until the center is completely firm, as the filling continues to set while cooling.
- Remove the pan from the oven and let the bars cool completely in the pan. Cover and refrigerate for at least 3 hours, or until the filling is thoroughly chilled and firm enough to cut neatly.
- Use the parchment overhang to lift the chilled slab from the pan. Cut into 16 squares with a sharp knife, wiping the blade between cuts for clean edges. Dust with powdered sugar just before serving, if desired.
Notes
Frequently Asked Questions
Are cassava flour lemon bars gluten-free?
This recipe uses cassava flour instead of wheat flour. If you need the bars to be strictly gluten-free, check the labels on your packaged ingredients and avoid cross-contact from shared utensils, pans, or work surfaces.
Can I use tapioca starch instead of cassava flour?
Not as a direct replacement in the crust. Tapioca starch behaves differently and can produce a chewy base rather than the tender crust intended here. Use cassava flour for this recipe.
Why is my lemon filling still loose?
It may need more baking or chilling time. When the pan comes out of the oven, the edges should be set and the center should wobble only slightly. Let the bars cool completely, then refrigerate them for the full three hours before judging their texture.
Can I make these bars dairy-free?
The filling contains no dairy, but the crust uses butter. A dairy-free butter substitute may work, though it can change how the crust bakes and holds together. Check that any substitute suits your dietary needs.
How should I store leftovers?
Keep the bars covered in the refrigerator for up to 4 days. Place parchment between layers if you stack them, and wait to add powdered sugar until serving. For the neatest presentation, cut only the portions you need and keep the rest chilled.
One More Tart Bite
I like the balance in these gluten-free lemon bars: a tender cassava flour crust underneath a bright, soft filling. They look cheerful on a plate, but they do not need decoration to earn a place at the table. I often cut the pan into small squares, knowing someone will come back for another.